| |||||||
PiMowBot - the smart π lawnmower robotWelcome to PiMowBot - a smart, autonomous lawn mowing robot based on the Raspberry Pi and REBOL. Most parts of the PiMowBot lawnmower robot (the entire housing, chassis, and essential parts of the PiMowBot cutterbar) can be self-manufactured using 3D printing technologies. You can purchase an official license[1] for the bundle of the "PiMowBot-It!" management software[2] for €19,99 EUR only here. The software bundle already contains all necessary modules of the management software, which are required for a smart, mobile and autonomous lawnmower robot based on the Raspberry Pi. The software works with all Raspberry Pi models. Due to the special requirements on power consumption, this project has been realized with the low-power and low-cost Raspberry Pi Zero.
Here are some of the key specifications of the PiMowBot lawnmower robot.
Please refer to the release notes for an overview and information on the latest version of the software. Note: The "PiMowBot-It!" management software is still "Work in Progress" (WiP). At present not all features mentioned here are fully implemented. Especially the optical object/obstacle detection needs further improvement. All screenshots of the web user interface shown here are from the current release and are not mock-ups. Buyers of the current release receive all upgrades up to the final version of the PiMowBot-It! software bundle free of charge. The final version of the software contains the functionality described on this project page. The hardware shown in the following photos is used for illustration purposes only and as an example of how PiMowBot looks like and how it is set up. Please purchase the required hardware from the respective manufacturers or through their sales channels. TGD-Consulting only offers IT services and software solutions. You want to make your own PiMowBot based on the "PiMowBot-It!" management software? Then purchase a license and read on to find out... As a quick start, you'll get here directly an answers to the most frequently asked questions:
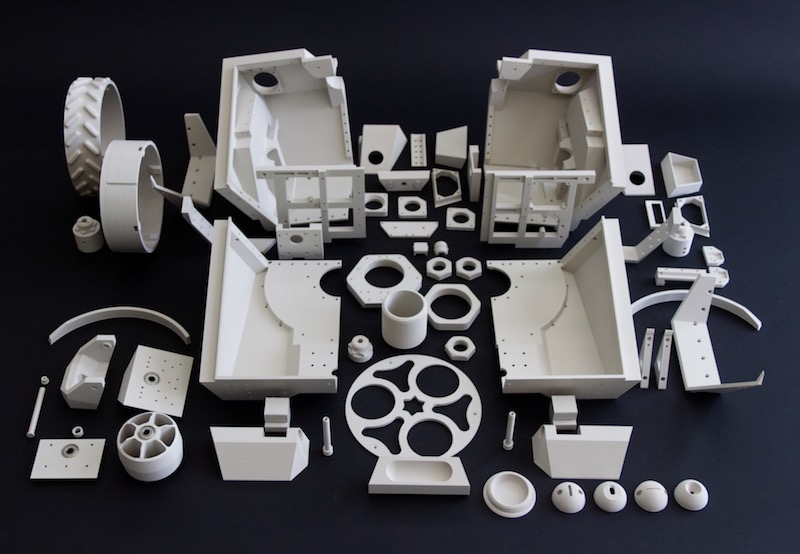
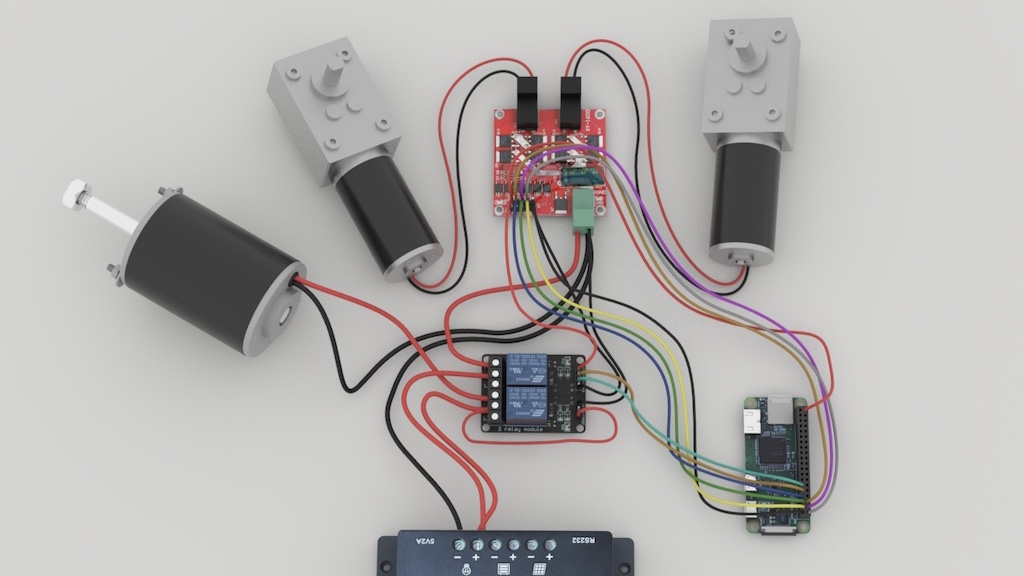
More answers to questions can be found in the FAQ or at the Deutsches Raspberry Pi Forum. In addition to the information on this PiMowBot project page, the assembly of a PiMowBot is also described step by step in an online tutorial. The name PiMowBot stands for π lawnmower robot and represents the extension of a common Raspberry Pi to a smart solution for mobile and autonomous lawn mowing. A PiMowBot is amazing. In addition to automatic, fully autonomous mowing, the PiMowBot can also be remote-controlled manually (RC mode) and thus serves as an innovative "toy" for women, men and adolescents. All important functions of the PiMowBot can be controlled and monitored remotely or easily from the garden terrace using a browser from any PC, tablet or smartphone. Get to know the advantages and possibilities of the π lawnmower robot in detail and convince yourself right here and now on Internet of the "PiMowBot-It!" management software and its simple, smart operation as well as the extensive configuration options. Here you see From the very beginning of the project planning, we made sure that the cost of materials for all components did not exceed EUR 300. The most expensive components are the solar module and the battery for the autonomous power supply of the lawnmower robot. The housing of the PiMowBot lawnmower robot is designed in such a way that it can be printed out by each maker himself using the FDM process with standard 3D printers. PETG or ABS/HIPS should be used as filament instead of PLA, as the lawnmower robot is exposed to various weather conditions when used outdoors. The total price of a PiMowBot including all required components is between 250,- and 300,- EUR, depending on type and number of components/sensors. Those figures already includes the licence costs for the "PiMowBot-It!" management software. The version of the PiMowBot shown on this site consists of the following components: In the next section the assembly and the exact function of the PiMowBot lawnmower robot is described in more detail. The outer appearance of our PiMowBot prototype is characterized by the inclined solar panel, the sensors at the front and the external WLAN antenna. Typically, the wireless USB adapter operates with an external WLAN antenna in client mode. If required, it can also be reconfigured as a WiFi hotspot/access point.In addition to generating photovoltaic electricity, the solar panel also serves as a housing cover for the PiMowBot. The panel can simply be lifted to access the internal components. The built-in components are low-maintenance. No abrasion of the electric motors of the mowing unit and drive or of the electronics is to be expected. Only the battery must be replaced after a few years, as the number of charging cycles for batteries is limited. Due to the dimensions of the PiMowBot, all components can be easily installed in the 3D-printed housing. That's why every ambitious user can assemble the PiMowBot with a bit of skill. All components can be purchased directly from the Internet. The sources of supply are partly linked in the above lists. We are using a Raspberry Pi Zero for our prototype PiMowBot, which will be extended by the Witty Pi Mini as well as the sensors and actuators. The final version of the PiMowBot does not have to eschew the comparison to lawn mower robots in the price segment over 1000, - EUR. The splash-proof and outdoor 3D-printed housing is not particularly expensive and is easy to make for any maker with their own 3D printer. At least 3-4 filament rolls of 1 kg each are required - depending on the desired colour selection for the housing and the printed parts for the cutting unit and chassis - to build your own PiMowBot. To obtain a matt surface finish on the printed parts without additional finishing, it is recommended to use ABS or HIPS filament for printing. Compared to ABS, HIPS is easier to handle and less prone to warping. It is a good idea to print certain parts of the PiMowBot with flexible TPU filament, if a quiet, low-noise lawnmower robot is preferred. In particular, some parts of the drive and cutting unit assembly should be printed with TPU. The flexible material properties of TPU reduce the propagation of vibrations and dampen noise transmission to the housing. TPU is also extremely UV and weather resistant. However, a spool of TPU filament will cost much more than the filament types already mentioned. When purchasing a license for the bundle of the "PiMowBot-It!" management software, you will also receive a 3D-print overview which describes in detail which parts have to be printed. Several video tutorials are available on YouTube that illustrate in detail and vividly how the printed 3D-models / components of the new model PiMowBot fit together and are assembled. At the moment you can view these tutorials:
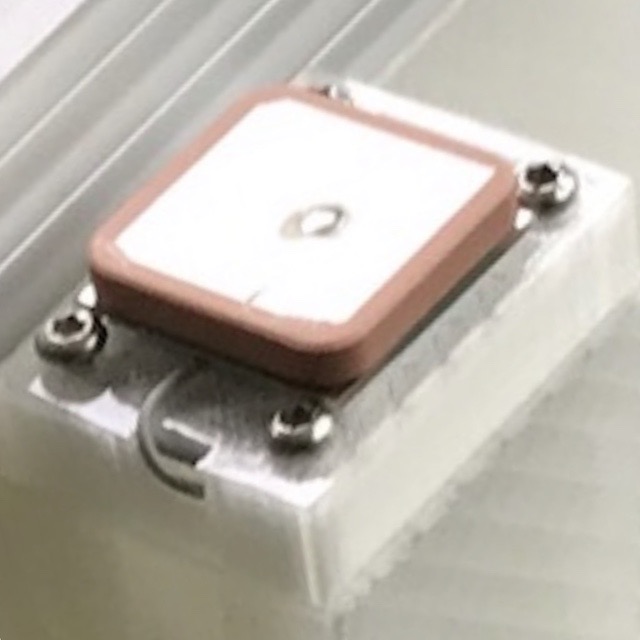
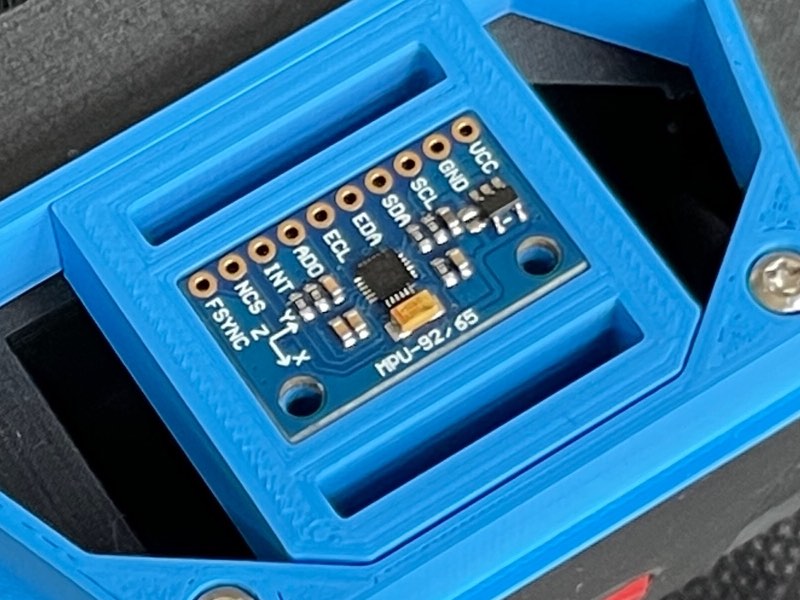
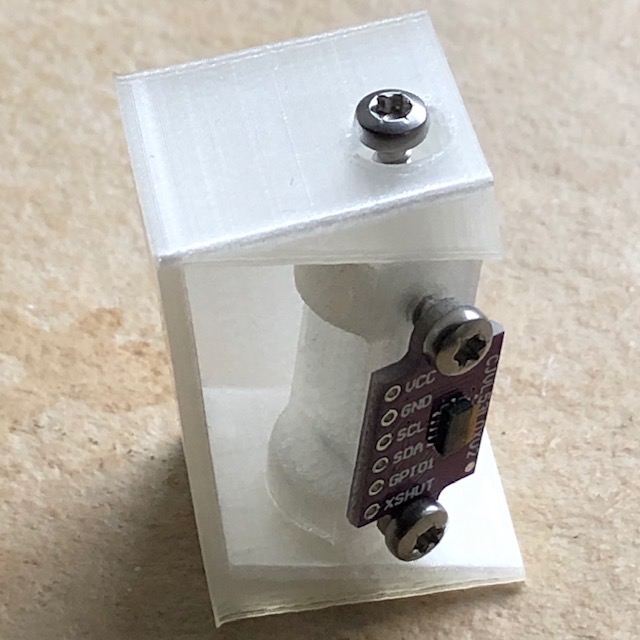
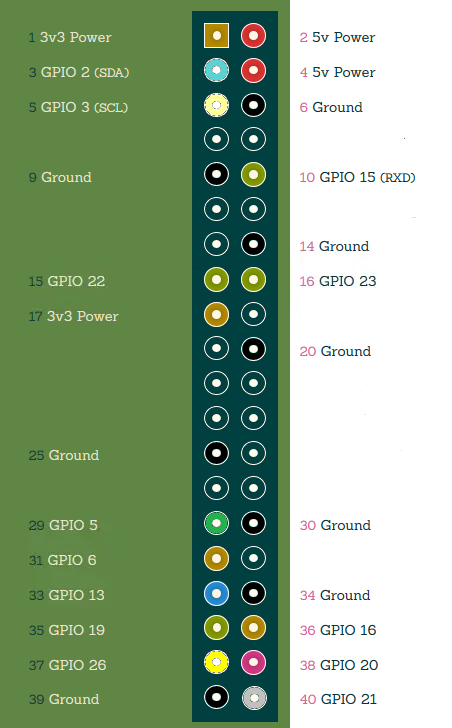
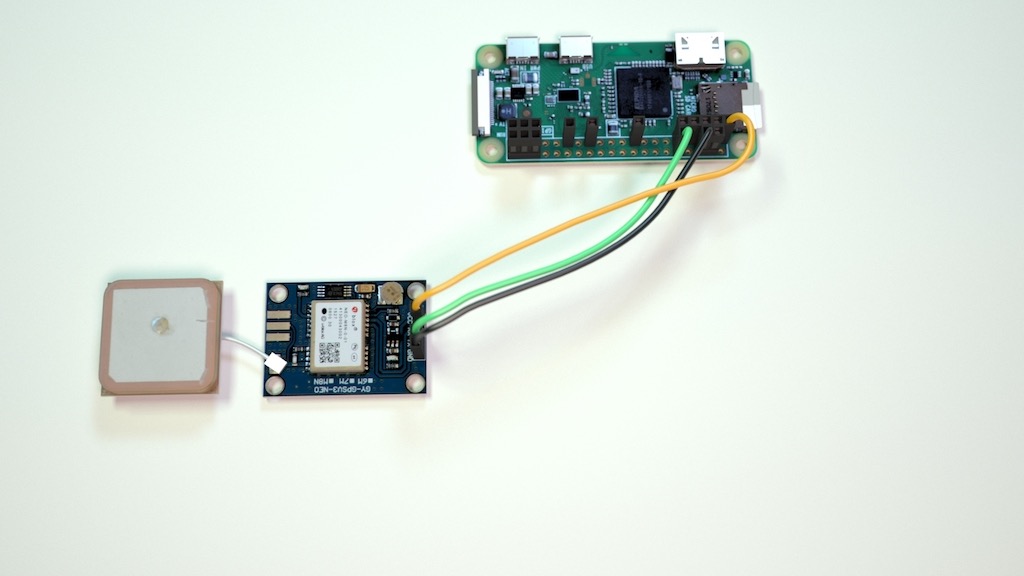
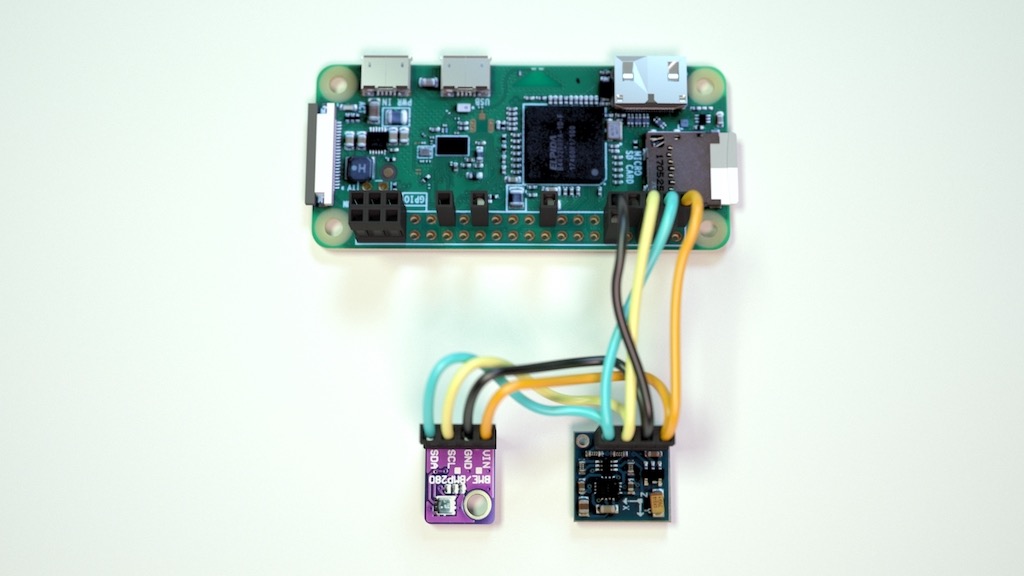
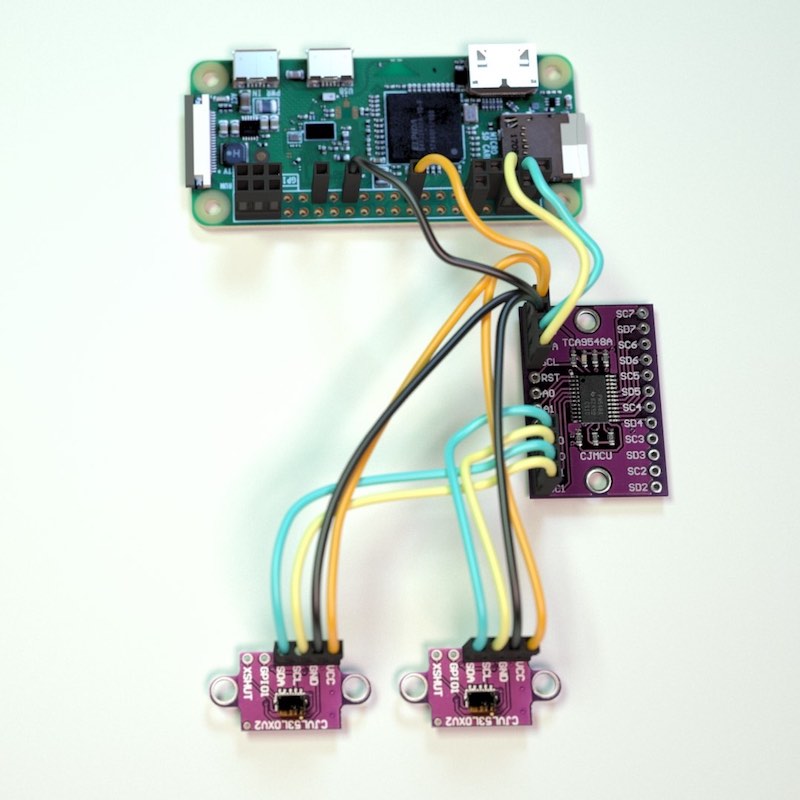
When installing the electronic components in the housing, the smaller components should be installed first. That is why the sensors have to be fixed first at the intended place at the front of the housing and the connecting cables have to be routed inwards. Step by step, the larger components are mounted in and on the housing. A reliable, adequate dimensioned electrical power supply (battery) is required for autonomous operation of the lawnmower robot. The capacity of the cycle-proof 12V battery should be at least 15Ah. The battery is positioned above the drive axis, slightly offset towards the motor of the mower, on the bottom of the housing. Thus the centre of gravity of the PiMowBot is ideally located. A stabilisation frame (holder of the relay module) prevents the battery from slipping inside the housing. When installing the electrical power supply, the battery is first connected to the corresponding screw terminals of the solar charge controller. The solar panel is then connected to the charge controller. Attention: While installing the electrical components in the housing and during operation, it is essential to ensure that there is no direct short circuit between the poles of the battery. This is what our first PiMowBot prototype looks like from the inside when the solar panel is lifted up: All sensors are installed in the lawnmower robot in relative proximity to the Raspberry Pi in order to keep the cable paths as short as possible. Most of the sensors are connected to the Raspberry Pi via the I²C interface. The only exceptions are the GPS module, which uses the serial interface, and the camera module, which uses the Raspberry Pi's CSI port.
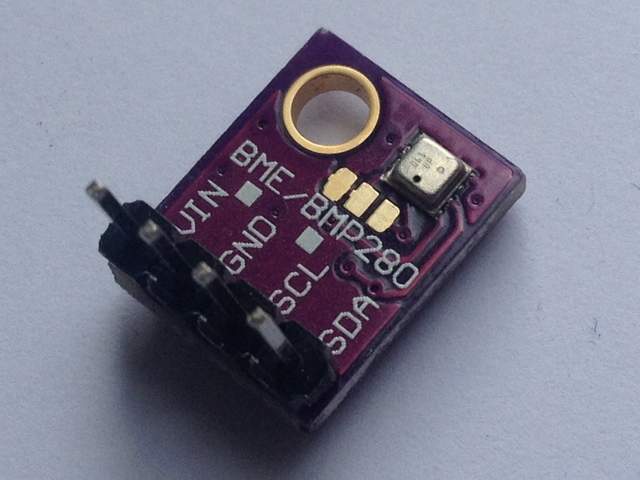
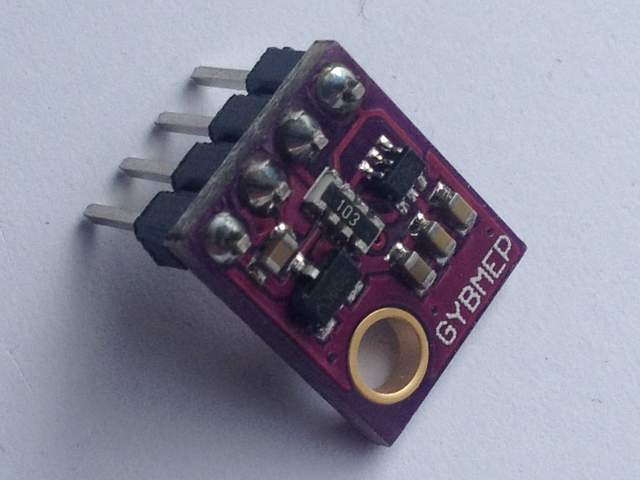
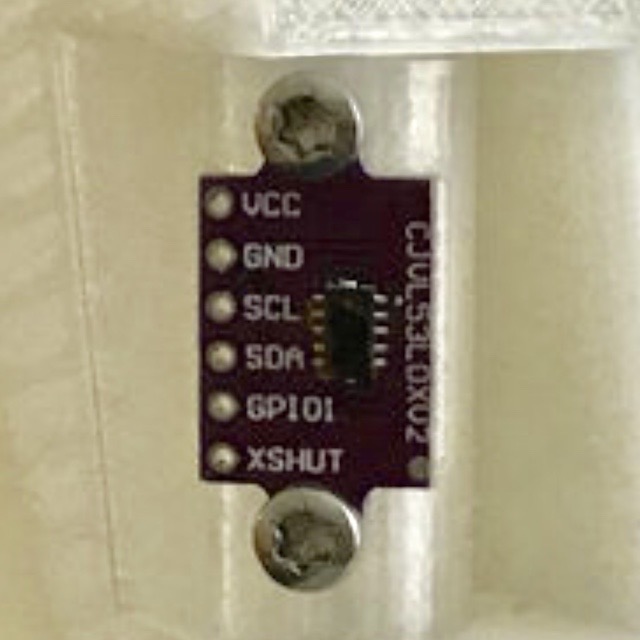
The measurement of the relevant measured parameters is done automatically by the connected sensors during operation. The measured values of all sensors are periodically queried and made available to the robot as telemetry data. All telemetry data is regularly logged and processed by the "PiMowBot-It!" management software while the lawnmower robot is in mowing mode. Our PiMowBot prototype captures not only the three measured parameters (temperature, humidity, air pressure) of the BME280 sensor, but also its geo-position and heading, as well as the voltage of the battery and the PV supply. The sensor system automatically notify the lawn mower robot whether the mowing process can be suspended and postponed to a later date if the lawn is too wet or the outside temperature is too hot. As a result, the quality of the lawn and grass cuttings is guaranteed and is not adversely affected. Normally, the optical sensor system recognizes the area of the lawn to be mowed reliably and independently. This is done with the LASER-assisted range finder and the visual object recognition of the built-in camera. The cutting system of the PiMowBot is height adjustable. It consists of a cutting disc with 3 rotating blades. The cutting system is surrounded by an skirt to optimize the mulching process and to protect against injuries. The cutterbar is automatically deactivated when the lawn mower robot is raised or tilted. The heart of the PiMowBot is the "PiMowBot-It!" management software , which includes the sensor module, a web server module, the control module and the archiving & plotting module. With the help of the latter PiMowBot-It! archives all operating data and prepares the telemetry data for graphic display as a plot. The graphics are automatically updated at the end of each mowing process and made available as resources for the web server pages. The travelled path of the lawn mower robot on the lawn is displayed on clearly arranged maps. The day, week, month and year graphics (see above) of selected telemetry data are enlarged by clicking on them. All components of the management software - except the interpreter - are closed source and require the purchase of a license. The software requires a REBOL3 runtime environment / interpreter. If you like, you can compile the source code of the REBOL3 interpreter for the Raspberry Pi by yourself. The Master Branch is released under the Apache2.0 license on GitHub. Alternatively, you can download a binary for Raspbian directly from our homepage. The REBOL3 interpreter is also part of the software bundle of the "PiMowBot-It!" management software. The operation of PiMowBot-It! is easily done via a normal web browser. The web server module handles all communication and control. A manual control via the web browser interrupts the autonomous operation of the lawnmower robot. So a simple emergency stop is also possible from a distance. In RC mode, the lawnmower robot is simply controlled by the tilting angle on tablets or smartphones. On all other devices, press the corresponding buttons in the WebUI. You can configure the main functions of the PiMowBot using the web server module. From geofence settings to mowing scheduling and enabling autonomous operation, all important parameters are configured centrally from the browser via the system settings. An overview of the various setting options is shown in the following figure. Note: By factory default the configuration interface (PiMowBot-Settings) can only be accessed via the same network segment where the PiMowBot is located. If necessary, this can be adapted to your own security requirements. If no address for the Admin IP nor an IP range is specified, the π-MowBot can be configured from any IP address! Optionally, you can set the access control by an individual combination of user name and password. Use the following link to purchase a license of "PiMowBot-It!" and acquire the software itself. Please read the license conditions before you purchase a license of the software (Note: After receipt of payment you will receive the software bundle by e-mail within 3 working days at the latest). With the license for the software bundle you also acquire a limited, non-exclusive right of use for the respective modules. Additional licensing of the individual modules is not required. Nevertheless, in addition to individual licenses for the respective modules ( archiving & plotting / web server ), volume licenses for our software can also be purchased if required. Detailed information on prices and quantity discounts are available upon request. Existing customers can upgrade their license to the current version of PiMowBot-It! management software at a discounted price of 9,99 EUR. Installation & Start: The software comes as a tarball, which only has to be unpacked (tar xvf PiMowBotIt.tar) and the "PiMowBot-It!" management software is ready for use on the Raspberry Pi. By manually calling the shell script ./PiMowBotIt.sh start the PiMowBot-It! modules are started on the Raspberry Pi. This script can of course also be used as an init script to automatically start PiMowBot-It! be integrated into the system. As an alternative to the shell script, the PiMowBot-It! modules can also be executed individually. By entering ./bin/r3 PiMowBotIt.r & the Archiving & Plot module and the Sensoring module are started. The start of the web server module is done by this command ./bin/r3 Webserver.r & . However, we recommend that you include the web server module as a ReSpawn process in /etc/inittab or as a systemd-service. This has the advantage that the web server module restarts each time it is closed. Usage: As already mentioned above, the further use and configuration of the PiMowBot-It! management software is amazingly simple. It is primarily done by using the browser on pc, tablets or smartphones. Simply enter the IP address of the Raspberry Pi and the used port of the web server module in the browser ( eg: http://192.168.0.100:8080 ) as URL and go for it. Everything else is self-explanatory or reveals itself by itself. We hope you are just as convinced by the benefits of the PiMowBot and the smart design of the software and 3D printed parts as we are. If you have any questions, requests or suggestions for improvements regarding PiMowBot or the "PiMowBot-It!" management software, we are looking forward to your enquiry. Are you interested in further software and projects developed by us? Then you should also visit these sites: | |||||||
- Copyright 2014-2023, TGD-Consulting - FAQ - PiMowBot powered by Serve-It! TNG - |